Tuesday, April 19, 2011

Tulip Place Mats- tops done


I have been working like a demon on my spring place mats in the hopes of getting them finished for the Easter weekend in time for a family dinner.


The appliqued stems and leaves took much longer than I had expected.
I had to practice applique with my new machine for a bit before I trusted myself to applique the real thing on the place mat tops.  I found I was getting pretty good at it by the 5th place mat! LOL!

I managed to find what I think is the perfect lime green batik fat quarters to use for the outer borders and for the backs.  5 out of 6 place mats tops have the applique complete and the outer borders on. Not bad, I think! :)

Tomorrow I plan on 'enveloping' the first 4 place mats.  (Sew with right sides together, then turn right side out....) Will I get all 6 quilted by Saturday's Easter dinner??? Probably not, but I have decided that I will use them unquilted if necessary, and then quilt them after the weekend.  Also our number of dinner guests has increased so I also hope to make a 7th place mat!  Ambitious, I know...

A note about applique; I'm very much a beginner here, and the 2 sided fusible web "Steam a Seam 2" works quite well once you get on to it. But why don't they have the sides labeled?  What's wrong with labeling "Remove first" on the paper side which is supposed to come off first and then labeling the second side "Trace here" or something obvious instead of having both sides blank!  Yes, I traced some of my leaves on the wrong side, the side that comes off first...  But I managed to 'wing it' :D

Here are photos of the completed tulip tops! Nice and bright, eh?!


Quite "springish" , if I do say so myself!  LOL!


Labels:

Friday, April 15, 2011

Spring Tulip Place Mats

Spring isn't springing here in central Alberta as it should! (We got dumped with another 5 inches of wet heavy snow yesterday. All the winter snow hasn't even melted!) So I thought I might help spring along by making some spring place mats in colorful pastel batik fabrics. This is a pattern I found online from the "Quick and Easy Quilting" magazine April 2002 Vol. 24 No. 2 Pages 52-54.


The place mats are coming along well, but as with most things, I guess, they are taking longer and a bit more work than expected.

The tulips themselves are pieced, but the stems and leaves are appliqued onto the mats afterwards. I'm not very experienced with applique work to say the least, but I decided it was time to change that.

My first experience was with hand applique on a few of the blocks on my very first quilt, my sunflower sampler quilt.  Then I hand appliqued the hearts on my "I Love Hearts" tote bag, (the one my husband calls my "Mary Poppins" bag!  :)

The reason I hand appliqued them was because I hand quilted most of my first quilt and, for some reason my sewing machine (Pfaff 1540) doesn't have a decent satin stitch. It also helps to use the proper fusible web material with your appliques which was a mistake I made with the tote bag hearts.

The 'Lite Seam 2 Seam' fusible web I'm using now works pretty well. Making the leaves was easy although time consuming... Tracing the leaf shapes on the fusible web paper, then cutting them out, peeling off the back paper,  ironing the leaf shapes to the back of the green fabric, then cutting the fabric leaves out, peeling off the 2nd paper backing and finally ironing then on the place mats.


Doing the stems was harder...  Cutting a long half inch strip of green fabric and and a long piece of the fusible web about the same size, then attaching the fabric strip to the fusible web, by slowly stripping one side of the paper off as you try and attach the strip of fabric, pressing it on to the sticky web with your fingers was a bit tricky.  Next it had to be chopped up to stem sizes and ironed on the placemats.  I made the mistake of trying to iron the fabric to the long strip of fusible web so now I have sticky web on my iron....  Plus its important to make sure you peel the proper side of the paper off first. Why in the heck the fusible web isn't labelled, I don't know!


But, okay, so far so good!   I have 4 place mats tops mostly done... Now comes the hard part:  I have a new sewing machine (a beautiful Janome 7700) with all kinds of fancy embroidery stitches, but I haven't yet tried to applique on it. I need to check the manual and see which foot to use and which setting to put it on, thread to use, then do a practice applique with the 2 extra leaves I made.
So.... time to get to work! :)

Labels: , ,

Saturday, April 9, 2011

Some Projects Completed/ New One Planned

 Took my old Pfaff in for repairs again but took it to Red Deer Sewing Centre this time. Hopefully they can fix it for a reasonable price.  But I took the big step into the modern world of sewing and quilting and I bought an new sewing machine there!  It's a beautiful Janome 7700 with lots of fabulous options...
After I 'test drive' it for a while, I'll critique it... LOL!


"Towne Girl" purse #2, just needs the zipper ends stitched down to the sides of the bag and the little copper buttons sewn on... :)


I almost finished the chevron baby bag today. I sewed the last pocket in the lining, then machine quilted the outsides of the bag to a large piece of batting. Next I trimmed the batting from around the edges of the bag. After that I pinned the handles to the ends of the bag and sandwiched the lining and the back outside with the right sides facing. I sewed a 1/4 inch seam around the whole thing and forgot to leave an opening on one side to turn the bag right side out, so I had to rip open 5 inches of the seam...
No harm done! After pressing it really well, the bag was open and lying flat. next step was to sew the sides of the bag (right sides facing.)
Ooops! Almost forgot the zipper!

  This is the front of the bag, made from the left over fabric from my "Modern Baby" quilt. Adapted from "Batik Bag" directions, downloaded from "Keepsakequilting.com"


Back of baby bag. Just need to sew in the zipper...


Fabrics selected for my next project... spring tulip place mats. :)

More about that next time! :)


I love my new Janome 7700!


Labels: , ,

Saturday, April 2, 2011

Bags!


Started a new "Towne Girl" purse... this one I plan on keeping myself, LOL!

Two separate sides of the "Towne Girl" purse... ready for the zipper.


 The 2 sides are quilted and enveloped, with the handles sewn on, but I needed a smaller zipper to finish the purse. 

Insides of purse with lining and pockets & my kitty helper taking a break! :)
Went to Red Deer yesterday and bought 3 zippers, hoping one of them would be perfect!  The I spent the afternoon making fabric cases for the zippers, one for the purse above and one for my other current project, the little pink bag below. :)

I'm also two thirds done a baby bag to match my pink "Modern Baby" quilt. I tried to follow the directions, which I had downloaded free off the internet, but they are not very clear or straightforward. I have made a number of bags before so I knew what I was doing. Otherwise as a newbie, I would have become rather frustrated with these directions.  The directions are called "Batik Bag" from the www.keepsakequilting.com site.  
Chevron front design
This was my first time trying to sew diamonds together. I learned the hard way that you do NOT match up the sides exactly when you sew the rows together, you have to make a slight overlap at each end, with a corner of one diamond sticking over at one end and a corner of the other diamond sticking over at the other end...

 I loved the chevron front created out of diamonds (or, for the mathematicians in the crowd, rhombis :)  so I  made a diamond tracer out of cardboard and then traced 34 diamonds from the wrong sides of the leftover fabrics from my "Modern Baby" quilt.  25 of the diamonds created the bag front.


The back was supposed to be a plain piece of fabric with a 9 diamond pocket, but I changed it and made the 9 diamond/ chevron pattern part of the back. I decided to add more pockets on the inside instead... :)


One other tip when sewing together a bunch of squares or blocks...
Once you have them arranged the way you want them, take a photo before you start sewing them together.  I DIDN'T do that and wasted a lot of time taking diamonds apart again... I had been trying to save time by chain piecing the diamonds, but after a while I realized I had put some of the blocks back into the row upside down so they were now next to an identical one in the next row, which I did not want!  Then I had to start shuffling them around again, ripping some diamonds apart again, and rearranging them. I wished I HAD taken a photo. 

After considerable time wasted finding the 'perfect' arrangement, I did get my camera out and take a photo. And sure enough, I did have to refer to that photo a couple of times to get the diamonds in the right order. Lots of wasted thread and wasted time seam ripping could have been avoided!!!

Outside of bag sideways: Front on right,  bottom, and back of bag on left sewn together

The lining of the bag has been cut. Now to get the inside pockets done!
But, ALAS! I am having sewing machine issues again! This time it's even worse than last time and I only just got my machine serviced and cleaned 2 weeks ago!!!  I am so fed up with my Pfaff 1546, I'm thinking about using it as a boat anchor!


Labels: , , , ,

Completed "Spicy Spiral" Table Runner


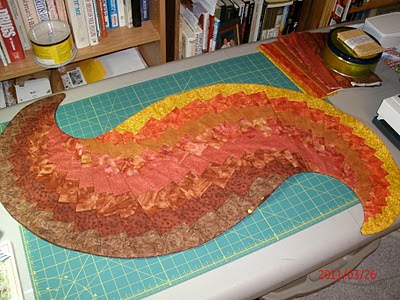
My "spicy spiral" table runner is finished now and I'm quite pleased with the way it turned out!  It looks great on my oak dining room table and the colors fit in well with the tawny wall color.


Close up of runner


It was fun to make and really not that difficult. The hardest part was cutting on the left side of the wedge shaped mirror. 

 I had some scrap strata set left over so I used my mini 14 inch 9 degree ruler and cut it up to make a small version of the table runner.  That one is all sewn together now, too, but is not completed... 

I got side tracked onto another couple of projects, LOL!

Labels: